Monday, September 26, 2011
Sunday, August 28, 2011
Brazilian Cherry
Michael and I decided that we wanted to do a wood wall in the study, so we decided to look into it. On Saturday we decided to make a trip to Lumber Liquidators in Charlotte. It is extremely close to the loft. So, we went in just to look. We walked around and were discussing how much we should spend per square foot on this project, trying to keep in mind that this was a completely unnecessary project for the completion of the condo. We talked about different options all of them comprised of woods that were "utility" grade. Utility grade is flooring that has major defects, knots, open knots, missing tongues, machine burns, splits in the wood and short pieces. But, for our wood wall project we thought it would be cool to have all the variation. And, the price of utility wood is about $0.89 per square foot. However, you have to figure at least 15-20% in wastes.
We walked out of Lumber Liquidators with no decision on the oak utility. Outside of the store, Lumber Liquidator had pallets of woods. They didn't have signs on them; they were just sitting outside. A pallet caught my eye. I walked directly to it. It was a beautiful unfinished dark wood. The wood was 3" wide and all were the same length, 12". Each bundled had 12 wood pieces. Michael and I could not figure out what type of wood. Michael also had a feeling that it was completely out of our price range. I went back in the store to ask what it was and to see what the price.
The wood was Brazilian Cherry, short planks. And, it was $1.19 a square foot. The store had this wood for a very long time, and it had never sold. A year ago they were selling it at $3 a square foot. And, if we had to order more, it would be $5.50 a square foot. No one wanted it, and they wanted to get it out of the store. They wanted to move it. The store paid $0.90 per square foot for the lumber and I paid $1.19. I bought the whole pallet. He told me that the pallet had 300 square feet on it, but looked to have much more than that. So, all said and done, the sales manager said I got the best deal of the day by a long shot.
The moral of the story: always ask, even if you think it is out of your price range.
Brazilian Cherry is a very hard wood. We are going to use it in the upstairs bathroom. We will be laying in a brick layout as shown in the picture. The picture is two bundles layout in the bathroom.
Friday, August 19, 2011
Picture Update: Week 3
End of week three. I'm ready for it to be done.
Next week is rough in inspection. We are hoping this will go smoothly.
Looking from the kitchen to the den:
the new bedrooms:
Looking down the downstairs hall way to bedroom #1:
In Bedroom #1:
In bedroom #2 (upstairs):
Bedroom #2, closet and bathroom entrance:
Loft/Office:
Stairs relocated:
Thursday, August 18, 2011
Lighting: Sconces
Ok blog followers, I need some help. Because of the ceiling/floors, we are going to have to go with sconces in the hallway and the bedrooms. The problem is I need something inexpensive but innovated. My design choice would have been the new Kwark Wall Light (pictured to the above). However, it is priced at $1800, which is completely absurd. I've gotten several choices that I've sent to Michael. If you see one at a reasonable price...below $100, and the more towards $50 the better, please leave a comment or comment on my facebook wall.
Thursday, August 11, 2011
Text from Contractor
So, this week has been crazy busy at work for me. I have not kept up with the contractor as I normally would or should. So, today I texted him to touch base on how everything was going. And, he sent me this picture! In this picture you can see that they reused the staircase, and turned it 90 degrees. They built the landing necessary to have a laundry closet underneath. They moved the electrical panel. They have framed the downstairs bedroom. And, they have moved the necessary plumbing and other utilities for the upper floors to the far wall. The only thing left from the chase that we are moving is the cable lines. We are in contact with the cable company to move them.
We'll post more pictures soon!
Tuesday, August 9, 2011
Surprise in the Mail
Today I received a package at my front door. When I drove up, I thought, "What did I order for the loft?" With out hesitation, I went around to the front door to see that the package was from McBee, SC. In the package was a book, Frank Fontana's Dirty Little Secrets of Design. My aunt, Anna Weir, sent me this book! What a great surprise?!? She saw it and said it had many loft style ideas and pictures, which I completely agree. This book is full of great DIY projects. One of which I would love to indulge, but I'm going to make it for someone. I'll post it soon.
Thank you Anna. The surprise made my week. Love you!
Sunday, August 7, 2011
Week 1: Pile of Debris
This past week was mainly demolition work.
Here's what happened:
- A/C unit is up and running. Thankfully it works!
- They removed all the interior walls. From the pictures you can tell the apartment is even more open than it was. And there is a ton of debris.
- They prepared the floor for tile or wood flooring.
- They have made "friends" with the maintenance guy for the apartment complex. This is great when you have a multiple unit dwellings.
Here's what we found out:
- The HVAC can be run in the crawl space. This means we can put vents in the floor.
- The chase can be moved, but to a location different than what we were thinking.
- We need some kind of window coverings. The windows are old and large. The amount of heat loss/gain from the windows can be mitigated with blinds or drapery. We will be getting a quote for them soon.
- Since we are concerned with heat loss/gain, Chuck suggested to insulate the floor.
Here's what we purchased this past week:
- Floor tile
- Returned one vanity, and replaced with a smaller one that fit the room.
- Toilet for the up stairs.
- The back splash for the kitchen.
- Chose the granite. Will post more later, but here is a picture with the granite, back splash, and cabinet color (not style).
Tuesday, August 2, 2011
Lowering Energy Costs: Ceiling Fans
Michael and I are going to install ceiling fans in the den and kitchen. Simple and modern for $64. The only problem with this fan is the controller that is provided looks like it is from the 80's. Pay the $12 to get an attractive fan controller. Click the link and see pictures on amazon.
Westinghouse 7861400 Industrial 56-Inch Three-Blade Ceiling Fan with Ball Hanger Installation System, Brushed Nickel
One thing that people might overlook is the value of a ceiling fan. Ceiling fans have the ability to circulate air throughout a living space with minimum amount of energy. Most ceiling fans use 50-90 Watts to operate. This particular fan uses around 60 Watts. An air conditioning unit can use anywhere from 2000-3000 Watts. And, a window unit uses about 600-800. While I understand what everyone is thinking. You can't be comfortable with just a fan when it's 100 degrees outside. I agree. However with a fan on, it's much easier to raise the temperature on the air unit one or two degrees, saving you more than you think. Raising your temperature by 2 degrees can save up to 10% on energy usage on A/C.
That's not your only savings. In the wintertime reverse your fans (there is usually a switch on the fan) to keep warm air circulating down instead of letting all the heat rise through to the next unit or into the attic. Turn the fan on low during the winter to bring that warm air from the top of the room to where you are. In my case, a fan will be crucial during the winters with the 18' ceilings to get that warm air down.
Duke Energy, Progress Energy, Georgia Power, all lists it as one of the ways to lower an energy bill.
As Alabama Power states, Be a Fan of a Fan.
Westinghouse 7861400 Industrial 56-Inch Three-Blade Ceiling Fan with Ball Hanger Installation System, Brushed Nickel
One thing that people might overlook is the value of a ceiling fan. Ceiling fans have the ability to circulate air throughout a living space with minimum amount of energy. Most ceiling fans use 50-90 Watts to operate. This particular fan uses around 60 Watts. An air conditioning unit can use anywhere from 2000-3000 Watts. And, a window unit uses about 600-800. While I understand what everyone is thinking. You can't be comfortable with just a fan when it's 100 degrees outside. I agree. However with a fan on, it's much easier to raise the temperature on the air unit one or two degrees, saving you more than you think. Raising your temperature by 2 degrees can save up to 10% on energy usage on A/C.
That's not your only savings. In the wintertime reverse your fans (there is usually a switch on the fan) to keep warm air circulating down instead of letting all the heat rise through to the next unit or into the attic. Turn the fan on low during the winter to bring that warm air from the top of the room to where you are. In my case, a fan will be crucial during the winters with the 18' ceilings to get that warm air down.
Duke Energy, Progress Energy, Georgia Power, all lists it as one of the ways to lower an energy bill.
As Alabama Power states, Be a Fan of a Fan.
Sunday, July 31, 2011
Scope of Work
Michael and I put together a scope of work for our contractor. This is needed so you and your contractor can be on the same page. It's a check list for him and you.
Scope of Work: 201 S. Hoskins Rd #131, Charlotte, NC 28208
Kitchen
· Plumbing for sink, refrigerator and dishwasher
· Electrical-necessary electrical for backsplash, range, microwave, refrigerator, dishwasher, disposal
· Installation of cabinets-Pick up from Pro-Stock Kitchen Greer location
· Build pantry next to refrigerator (counter depth) with door
· Build ledge for cabinets in front of window
· Install outlet behind fridge with switch for under cabinet lighting; lights installed by owner
· Install backsplash
· Granite installed by other
Downstairs Bathroom
· Remove flooring and secure subfloor-install concrete backer if necessary.
· Install floor tile-match existing seams and grout width; tile furnished by owner
· Reuse existing toilet and shower
· Install 31” vanity by pro-stock, vanity top furnished by owner, fixture furnished by owner
Upstairs Bathroom
· Frame new walls and drywall
· Run plumbing for new shower with two fixture (separate controls), toilet, and vanity
· Run necessary electrical for bathroom including light box centered above vanity and overhead shower light; both lights provided by owner
· Install 34”x60” shower pan from Home Depot
· Install tile surround in the shower to the ceiling provided by owner
· Install shower doors provided by owner
· Install vanity, vanity top, sink fixtures, shower fixtures, and toilet all provided by owner
Bedrooms
· Frame new walls and drywall.
· Extend loft floor to 2’ from window; match existing floor upstairs and existing ceiling downstairs
· Move chase to new wall.
· Run new electrical outlets and supply cable outlet for each room
· Install framing and windows provided by Chuck in upstairs room centered on existing window; Install transom window on wall facing den in upstairs room
· Build closet on upstairs and downstairs bathroom walls; install socket and bulb in closets with switch and sliding closet doors
· Match floor downstairs up to and inside the closet; hallway tile remains
· Move panel to hallway wall adjacent to closet (closet is going on wall where existing panel is located)
· Install 4 can lights in the downstairs bedroom provided by Chuck.
· Install Single light housing with switch upstairs; light provided by owner
General Items
· Install all doors; stainable slab doors provided by Chuck; owner will stain
· Install can lights in downstairs hallway; Provide 3 way switches at beginning and end
· Install light housing in kitchen, dining, and living room; owner will provide fan for living and kitchen and light for dining.
· Turn stairs and build landing; install metal rails provided by owner
· Save removed railings for owner
· Extend Laundry room under landing and expose large round post to kitchen area (if possible)
· Install necessary electrical, plumbing, and venting for washer and dryer
· Fix broken window
· Bring fire risers and sprinklers to code
· Install duct work for HVAC and ensure unit is functional; if not, replace
· Install new water heater (40-50 gallon; contractor advise on sizing)
· Install new baseboard trim, casing
· Remove all accumulated trash and debris
· Repair all existing drywall
· Reuse as much existing conduit, wire, switches, outlets etc. as possible
· Manage sub-contractors
Questions
· Fan for bathroom?
· Insulate walls?
· Make Operable windows?
· HVAC ductwork; using downstairs duct for floor vents upstairs (combine venting for bathroom, closet , and room up and down in one artery vent; run new ductwork in living area)
· Owner may request installation of new front door after evaluation of current door
· Painting done by owner; Owner requests use of tall ladder to paint walls over weekend
· Remove wallpaper.
Porcelain Owl: ZGallery
A few weeks ago I visited the ZGallery in Northlake Mall in Charlotte. One thing that caught my eye was this glossy white owl. It looks super modern but has an old classic feel. Another reason I love it is because my grandmother collected owls. She had them all over the place. This weekend would have been her 79th birthday. I told Michael the first time I saw it that I wasn't going to get it. But, if I kept thinking about it, and it was still there on our next trip; I wanted to buy it. Well today, Joanna, Michael, and I made a trip up to ZGallery. And I still love it. It was also on sale! My Mema was extremely stylish and would have loved it.
I feel that accessories in homes should invoke something personal; a person, a memory, an event. It's what makes a house/condo/townhouse, into a home.
This owl was $15 at ZGallery.
UPDATE:
Found by Dayna and Mandy, the Zgallerie owl is in the Big Brother house. I watched an episode of Big Brother to get a screen shot of it.
I feel that accessories in homes should invoke something personal; a person, a memory, an event. It's what makes a house/condo/townhouse, into a home.
This owl was $15 at ZGallery.
UPDATE:Found by Dayna and Mandy, the Zgallerie owl is in the Big Brother house. I watched an episode of Big Brother to get a screen shot of it.
Friday, July 29, 2011
Kitchen Cabinet
Michael and I priced out several places. Ikea, Home Depot, and Pro Stock Kitchens. In my home in Greer, SC, I used Pro Stock Kitchens and thought that their service and support were superior to other places. Also, they were extremely helpful with the layouts.
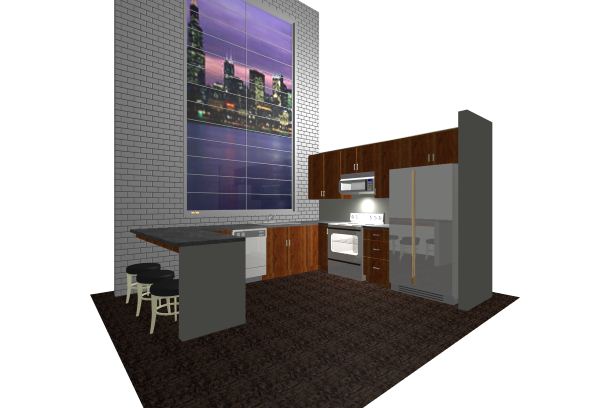
Michael and I decided to go with Pro Stocks because of price. We just got our kitchen cabinets, both vanities, and hardware for both for $2239 (including taxes). They will be here in a couple of weeks. We decided on a slab door for a modern look, and a medium brown to contrast the painted white brick and the black floors.
If you would like to visit Pro Stock Kitchen here is the information:
Pro Stock Kitchen
Carrie Phillips
4800 Wade Hampton Blvd
Unit H
Taylors, SC 29687
864-451-7777 (office)

Carrie has been a wonderful help. She has great ideas for kitchen layouts and home layouts in general. She is fun and I love going in there and talking about the projects she has going on. If you are doing a kitchen, I would highly recommend you paying her a visit to price out her cabinets. She can do really custom upscale to a custom cabinet on a budget. Here are her drawings and renderings of the cabinets. (Just to note, the city skyline in the window isn't actually what the view is in the apt... it just looked cool)
Michael and I decided to go with Pro Stocks because of price. We just got our kitchen cabinets, both vanities, and hardware for both for $2239 (including taxes). They will be here in a couple of weeks. We decided on a slab door for a modern look, and a medium brown to contrast the painted white brick and the black floors.
If you would like to visit Pro Stock Kitchen here is the information:Pro Stock Kitchen
Carrie Phillips
4800 Wade Hampton Blvd
Unit H
Taylors, SC 29687
864-451-7777 (office)

Carrie has been a wonderful help. She has great ideas for kitchen layouts and home layouts in general. She is fun and I love going in there and talking about the projects she has going on. If you are doing a kitchen, I would highly recommend you paying her a visit to price out her cabinets. She can do really custom upscale to a custom cabinet on a budget. Here are her drawings and renderings of the cabinets. (Just to note, the city skyline in the window isn't actually what the view is in the apt... it just looked cool)
Wednesday, July 27, 2011
Counter Depth Refrigerator
Monday, July 25, 2011
Fixtures We've Purchased
So, we picked out a bunch of stuff for the condo yesterday. We bought most of the bathroom fixtures online from one manufacturer. The reviews were good, so we are confident the quality will be at least decent. I've posted some pictures of our choices so far below...
Bathroom Faucet (3 LITB)-Two for upstairs and one for down...double sink below.
Shower Fixture (2 LITB)-We plan to have 2 in the upstairs shower.
Kitchen Faucet(1 LITB)-Simple and modern.
Upstairs Bathroom Sink (1 Ikea)-Double faucet with a single bowl...love.
Dining Room Light Fixture(1 Ikea)- This will be in the middle of the long living space...31" diameter.
Wednesday, July 20, 2011
Home Sizes Around the World
I found a really interesting article on Apartment Therapy about home sizes around the world. Anyone surprised that the US has the largest homes? Looks like the condo will be somewhere between the average size in Spain and France. Check above link for the full post.
US: 2,300sf
Australia: 2,217sf
Denmark: 1,475sf
France: 1,216sf
Spain: 1,044sf
Ireland: 947sf
UK: 818sf
US: 2,300sfAustralia: 2,217sf
Denmark: 1,475sf
France: 1,216sf
Spain: 1,044sf
Ireland: 947sf
UK: 818sf
Subscribe to:
Posts (Atom)


